May
5月4日
接触了一个新的动画库 Velocity.js
Velocity 是一个简单易用、高性能、功能丰富的轻量级JS动画库。它能和 jQuery 完美协作,并和$.animate()有相同的 API, 但它不依赖 jQuery,可单独使用。 Velocity 不仅包含了 $.animate() 的全部功能, 还拥有:颜色动画、转换动画(transforms)、循环、 缓动、SVG 动画、和 滚动动画 等特色功能。
安装
npm install velocity-animate引入
import Velocity from 'velocity-animate'
import 'velocity-animate/velocity.ui.js'
Vue.prototype.Velocity = Velocity
例子
import Velocity from 'velocity-animate'
export default {
    data() {
        return {}
    },
    mounted() {
	    this.$nextTick(()=>{
			// let mouse = document.getElementById('mouse'); 写法一
			let mouse = this.$refs.mouse_btn; //写法二  获取dom元素

            // 初始化的时候加载该动画函数。功能:循环加载图片,让其一直上下抖动,并且有一个过渡的动画效果(往上透明度为1,往下透明度为0.3)
			Velocity(mouse, {
				translateY: [50,0],
				opacity: [0.3,"easeInQuint",1]
			}, {
				/* Velocity 动画配置项的默认值 */
				duration: 1500,         // 动画执行时间
				loop: true,           // 循环
			});
	    })
	},
}5月8日
js 计算当前位置距离某个点的距离
获取当前位置
先在
manifest.json文件中进行配置,有两处地方微信小程序配置 勾选位置接口权限
源码视图
javascript"requiredPrivateInfos": ["getLocation"]引入 uni.getLocation
js//获取当前位置 getLocation() { let location = { lat: 0, lng: 0, } return new Promise((reserve, reject) => { //因为获取位置是异步接口所以需要使用promise uni.getLocation({ success(res) { location.lat = res.latitude location.lng = res.longitude, reserve(location); }, //获取失败则返回经纬坐标为0 fail(err) { reject(location ); } }) }) },初始化时,加载该方法,获取当前位置
javascript// 注意是异步,需要 `async & await` // 把获取到的坐标点位赋值给data里定义的变量 类型:object async onLoad(){ this.currentLoation = await this.getLocation(); }
计算距离
由于数据是
v-for出来的,所以这里用到了计算属性,在计算属性里,针对每一个item进行计算它的距离html<view v-if="item.latitude && item.longitude"> <label>{{getDistance(item.latitude,item.longitude)}}</label>km </view>jscomputed: { getDistance() { // 传入每个item的坐标点 return (lat1, lng1) => { let that = this; let lat2 = this.currentLoation.lat; let lng2 = this.currentLoation.lng; let rad1 = parseFloat(lat1) * Math.PI / 180.0; let rad2 = lat2 * Math.PI / 180.0; let a = rad1 - rad2; let b = parseFloat(lng1) * Math.PI / 180.0 - lng2 * Math.PI / 180.0; let s = 2 * Math.asin(Math.sqrt(Math.pow(Math.sin(a / 2), 2) + Math.cos(rad1) * Math.cos( rad2) * Math.pow( Math.sin(b / 2), 2))); s = s * 6378.137; s = Math.round(s * 10000) / 10000; s = s.toString(); s = s.substring(0, s.indexOf('.') + 2); // 把最终的结果 s return回去 return s } } }❓ 遇到的问题
微信小程序报错 wx.getLocation need to be declared in the requiredPrivateInfos field in app.json
💡 解决
需要在
源码视图的微信小程序配置里添加"requiredPrivateInfos": ["getLocation"]⚠️ 注意
小程序后台,需要开通一下地理位置接口 ( wx.getLocation ),以免上线的时候不能用。
📖 参考文档
5月11日
微信小程序体验版出现 运行环境错误
💡 解决
微信开发工具 -> 清缓存 -> 全部缓存 -> 编译 -> 最后重新上传提交
📖 参考文档
数据自动循环滚动
这里引用 vue-seamless-scroll 插件,实现对数据的循环滚动
- 安装
npm install vue-seamless-scroll --save- 组件引入
<vue-seamless-scroll></vue-seamless-scroll>

import vueSeamlessScroll from 'vue-seamless-scroll'  // vue2引入方式
import scroll from "vue-seamless-scroll/src"  // vue3引入方式

components: {
    vueSeamlessScroll
},- 参数配置
// 监听属性 类似于data概念
data() {
	//这⾥存放数据
	return {
		listData: [...],
	};
},
computed: {
	defaultOption () {
		return {
			step: 0.2, // 数值越大速度滚动越快
			limitMoveNum: 2, // 开始无缝滚动的数据量 this.dataList.length
			hoverStop: true, // 是否开启鼠标悬停stop
			direction: 1, // 0向下 1向上 2向左 3向右
			openWatch: true, // 开启数据实时监控刷新dom
			singleHeight: 0, // 单步运动停止的高度(默认值0是无缝不停止的滚动) direction => 0/1
			singleWidth: 0, // 单步运动停止的宽度(默认值0是无缝不停止的滚动) direction => 2/3
			waitTime: 1000 // 单步运动停止的时间(默认值1000ms)
		}
	}

},- 完整代码
<!-- 滚动列表 -->
<div
	v-if="markerArrs.length > 0 "
	class="scroll_list_box"
	:class="isShow ? 'showList' : 'hideList'"
>
	<div class="scroll_list_header">
		<div class="header_left">产业数据列表</div>
		<div class="header_right">详情</div>
	</div>
	<vue-seamless-scroll class="scroll_list" :data="markerArrs" :class-option="defaultOption" >
		<ul class="scroll_list_content">
			<li
				v-for="(item, index) in markerArrs"
				:key='index'
				class="scroll_list_item"
				:class="(index % 2 == 0) ? 'addBg' : ''"
			>
				<span class="item_left">{{item.name != null ? item.name : item.p_name}}</span>
				<span class="item_right">{{item.details}}</span>
			</li>
		</ul>
	</vue-seamless-scroll>
</div>.scroll_list_box {
position: fixed;
width: 100%;
height: 40%;
margin: 0 auto;
bottom: 0;
left: 0;
right: 0;
text-align: center;
visibility: visible;
/* 关键CSS代码 */
.scroll_list {
width: 100%;
height: 100%;
overflow: hidden;
position: absolute;
}
}uniapp 实现左侧菜单滚动
方式一 :scroll-top
<view class="category">
	<!-- 左侧 滚动的导航菜单 -->
	<view class="nav" :class="showCategory ? 'showNav' : 'hideNav'">
		<scroll-view
			class="bg"
			scroll-y
			:scroll-top="scrollTop"
			:scroll-with-animation="true">
			<view class="nav-item"
				:class="{'ac':active == index}"
				v-for="(item,index) in villageList"
				:key="index"
				@click="changeNav(index)">
					{{item.name}}
				</view>
		</scroll-view>
	</view>
	<!-- 右侧 item对应的列表数据 -->
	<view style="padding: 0 30rpx;"></view>
</view>export default {
data() {
return {
showCategory: false, //控制左侧菜单是否显示
active:0, // 当前tab的下标
scrollTop:0, // 当前tab距离整个菜单的高度
navHeight:0, //当前tab的高度
villageList: [], //导航菜单数据
}
},
methods: {
changeNav(index){
this.active = index;
this.scrollTop = this.navHeight*(index-2);
// 在这里请求接口 展示右侧商品数据
}
},
mounted() {
this.$nextTick(function() {
const query = uni.createSelectorQuery().in(this);
query.select('.nav-item').boundingClientRect(data => {
this.navHeight = data.height;
}).exec();
});
}
}<style lang="scss" scoped>
.category{
display: flex;
position: absolute;
width: 100%;
height: calc(100% - var(--status-bar-height));
/* 隐藏滚动条样式 */
::-webkit-scrollbar {
width: 0;
height: 0;
}
uni-scroll-view{
height: 100%;
}
.bg{
background:#F7F8F9 ;
height: 100%;
}
.nav{
width: 200rpx;
visibility: hidden;
.nav-item{
width: 200rpx;
height: 104rpx;
line-height: 104rpx;
background: #F7F8F9;
font-size: 28rpx;
color: #505660;
text-align: center;
position: relative;
}
.ac{
color: #229453;
font-size: 30rpx;
background: #fff;
}
.ac:before{
content: '';
display: block;
position: absolute;
left: 0;
top: 0;
width: 6rpx;
height: 104rpx;
background: linear-gradient(180deg, #229453 0%, #229453 100%);
border-radius: 2rpx;
}
}
.showNav {
animation: toShow 0.5s ease;
animation-fill-mode: forwards;
}
.hideNav {
animation: toHide 0.5s;
animation-fill-mode: forwards;
}
.goodsBox{
width: 550rpx;
padding: 0 30rpx;
.goods{
display: flex;
flex-wrap: wrap;
//padding: 30rpx 0;
.goods-item{
text-align: center;
margin-bottom: 56rpx;
margin-right: 65rpx;
uni-image{
display: block;
width: 100rpx;
height: 100rpx;
margin: 0 auto 32rpx;
border-radius: 4rpx;
}
uni-text{
font-size: 24rpx;
color: #505660;
}
}
}
}
}
// 显示左侧菜单
@keyframes toShow {
0%{
width: 0;
visibility: hidden;
}
100% {
width: 200rpx;
visibility: visible;
}
}
// 隐藏左侧菜单
@keyframes toHide {
0%{
width: 200rpx;
visibility: visible;
}
100% {
width: 0;
visibility: hidden;
}
}
</style>方式二 :scroll-into-view
<view class="category">
	<!-- 左侧 滚动的导航菜单 -->
	<view class="nav" :class="showCategory ? 'showNav' : 'hideNav'">
		<scroll-view
			class="bg"
			scroll-y
			:scroll-into-view="scrollTop"
			scroll-with-animation
			:show-scrollbar="true"
		>
			<view class="nav-item"
				:class="{'ac':active == index}"
				v-for="(item,index) in villageList"
				:key="index"
				@click="changeNav(index)"
				:id='"tab"+index'
			>
				{{item.name}}
			</view>
		</scroll-view>
	</view>
	<!-- 右侧 item对应的列表数据 -->
	<view style="padding: 0 30rpx;"></view>
</view>export default {
data() {
return {
showCategory: false, //控制左侧菜单是否显示
active:0, // 当前tab的下标
scrollTop: '', // 需要String类型
villageList: [], //导航菜单数据
}
},
methods: {
changeNav(index){
this.active = index;
this.$nextTick(()=> {
this.scrollTop = "tab" + this.active;
console.log(this.scrollTop)
});
this.scrollTop=''
// 在这里请求接口 展示右侧商品数据
}
},
}<style lang="scss" scoped>
.category{
display: flex;
position: absolute;
width: 100%;
height: calc(100% - var(--status-bar-height));
.nav{
width: 200rpx;
visibility: hidden;
height: 100%;
/* 隐藏滚动条样式 */
::-webkit-scrollbar {
width: 0;
height: 0;
}
uni-scroll-view{
height: 100%;
}
.bg{
background:#F7F8F9 ;
height: 100%;
.nav-item{
width: 200rpx;
height: 104rpx;
line-height: 104rpx;
background: #F7F8F9;
font-size: 28rpx;
color: #505660;
text-align: center;
position: relative;
}
.ac{
color: #229453;
font-size: 30rpx;
background: #fff;
}
.ac:before{
content: '';
display: block;
position: absolute;
left: 0;
top: 0;
width: 6rpx;
height: 104rpx;
background: linear-gradient(180deg, #229453 0%, #229453 100%);
border-radius: 2rpx;
}
}
}
.showNav {
animation: toShow 0.5s ease;
animation-fill-mode: forwards;
}
.hideNav {
animation: toHide 0.5s;
animation-fill-mode: forwards;
}
.goodsBox{
width: 550rpx;
padding: 0 30rpx;
.goods{
display: flex;
flex-wrap: wrap;
//padding: 30rpx 0;
.goods-item{
text-align: center;
margin-bottom: 56rpx;
margin-right: 65rpx;
uni-image{
display: block;
width: 100rpx;
height: 100rpx;
margin: 0 auto 32rpx;
border-radius: 4rpx;
}
uni-text{
font-size: 24rpx;
color: #505660;
}
}
}
}
}
// 显示左侧菜单
@keyframes toShow {
0%{
width: 0;
visibility: hidden;
}
100% {
width: 200rpx;
visibility: visible;
}
}
// 隐藏左侧菜单
@keyframes toHide {
0%{
width: 200rpx;
visibility: visible;
}
100% {
width: 0;
visibility: hidden;
}
}
</style>- 📖 参考文档
5月19日
引用 Hover.CSS 实现鼠标移入的悬浮动画效果
💡 两种引入方式
- 方式一
从官网下载 hover.css 文件放入本地项目,然后直接引用。
// main.js

import './assets/css/hover.css';- 方式二
安装
npm i hover.css --save全局引入
// main.js

import 'hover.css'
在需要实现动画效果的class中,加上对应动画的类名即可。
引入 WOW.js 滚动动画特效
安装
npm install wowjs全局引入
// main.js

import "animate.css"
import "wowjs/css/libs/animate.css"// 此地方要引入两个css

import wow from 'wowjs'

Vue.prototype.$wow = wow;
在需要用到的Vue组件中使用
<template>
    <div class="wow animate__animated animate__fadeInUp">Hello Word</div>
</template>

<script>
import {WOW} from 'wowjs'
export default {
	mounted() {
		this.$nextTick(() => {
			new WOW({
				boxClass:     'wow',      // 类名,在用户滚动时显示隐藏的框。
				animateClass: 'animated', // 触发CSS动画的类名称(animate.css库默认为“ animated”)
				offset: 0, //距离可视区域多少开始执行动画
				mobile:       true,       // 在移动设备上打开/关闭WOW.js。
				live:         true        // 在页面上同时检查新的WOW元素。
			}).init()
		});
	},
}
</script>- 📖 参考文档
5月25日
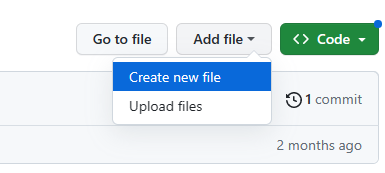
Github 上创建文件夹
点击 "Create new file"

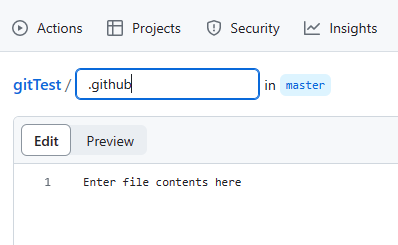
输入你要创建的文件夹名称(此时我们创建的其实还是一个文件而不是文件夹)

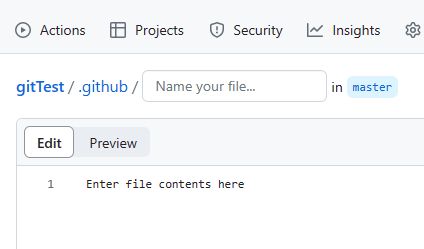
在上面的输入框里,按下 "/" 键,会出现下图(文件夹就创建好了)

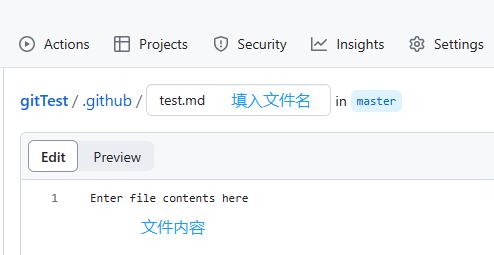
因为github不允许创建空文件夹,所以我们需要在文件夹里创建一个文件

最后点击保存即可

📖 参考文档
css 更改 input 输入框 placeholder 样式
更改默认的 placeholder 用到如下伪元素,针对各种平台处理,用的时候直接拷贝以下模板,根据需求往里面添加对应样式修改即可:
:-moz-placeholder {

}

::-moz-placeholder {

}

::-webkit-input-placeholder {

}

:-ms-input-placeholder {

}