腾讯地图使用总结
由于项目需要,踩了好多坑,所以在此做个归纳整理
在uniapp(小程序)中引入
<view style="height: 100vh;width: 100vw;">
    <map id="myMap" :scale="scale" style="width: 100%; height: 100%;"
        :show-location="true" :latitude="latitude" :longitude="longitude"
        :polyline="polyline" :markers="markers" :include-points="includePoints">
    </map>
</view>export default {
data() {
return {
scale: 15,
latitude: 25.09839, // 必填项
longitude: 117.03736, // 必填项
markers: [],
polyline: [],
includePoints: []
}
},
}引入地图组件过程中,经纬度两个属性值给定后,地图就算引入成功了。其余的属性,根据项目需要再进行相对应的配置。
🏷️ map 属性说明
| 属性名 | 说明 | 默认值 |
|---|---|---|
| id | 地图唯一标识 | - |
| scale | 缩放级别,取值范围为3-20 | 16 |
| show-location | 显示带有方向的当前定位点 | false |
| latitude | 中心纬度 | - |
| longitude | 中心经度 | - |
| polyline | 路线【Array】 | - |
| markers | 标记点【Array】 | - |
| include-points | 缩放视野以包含所有给定的坐标点【Array】 | - |
将中心点位设置为当前坐标位置
方法一:获取当前坐标点位信息 (uni.getLocation)
这里用到了 uni.getLocation 方法,来获取当前位置
let that = this; // 这行是关键,位置不要放错

uni.getLocation({
    type: "gcj02", // 这个获取到的点位相对准确一些
    success (res) {
        that.latitude = res.latitude;
        that.longitude = res.longitude;
    }
})
这里要注意的是用 that 来指代 this,位置要放在首行,不然后续给标记点 marker 赋值时,会赋值无效。(踩坑划重点😭)
方法二:移动地图中心点位到当前位置 (wx.createMapContext)
// 将中心点位移动到当前位置
let mpCtx = wx.createMapContext("myMap"); // 这里就用到了map组件里的 id属性
mpCtx.moveToLocation({
	latitude: that.latitude,
	longitude: that.longitude
});
这部分代码可以放在 uni.getLocation 成功回调函数里。当初始时,一获取到当前位置,就执行这段代码,将地图的中心点位,移动到当前位置。
添加marker标记
that.markers = [
    {
        iconPath: '../../static/img/address.png',  //表示点图片 建议使用.png格式
        name: '当前位置', // 点击marker时,出现的信息名
        id: 0,
        latitude: res.latitude, // 经度 可以通过getLocation api获取
        longitude: res.longitude, //纬度 可以通过getLocation api获取
        width: 25,
        height: 25,
        callout: {
            content: '当前位置',
            padding: '10px 5px 10px 5px',
            borderRadius: '12px',
            textAlign: 'center',
            display: 'ALWAYS'
        }
    },
    {
        iconPath: '../../static/img/map_home.png',  //表示点图片 建议使用.png格式
        name: '终点',
        id: 1,
        latitude: res.latitude, // 经度 可以通过getLocation api获取
        longitude: res.longitude+0.01, //纬度 可以通过getLocation api获取
        width: 40,
        height: 40,
        callout: {
            content: '终点',
            padding: '10px 5px 10px 5px',
            borderRadius: '12px',
            textAlign: 'center',
            display: 'ALWAYS'
        }
    }
];
🏷️ marker 属性说明
| 属性名 | 说明 | 类型 | 必填 |
|---|---|---|---|
| id | 标记点 id | number | 否 |
| name | 点击标注点时,显示的名称 | string | 否 |
| iconPath | 显示的图标 (项目目录下的图片路径) | string | 是 |
| latitude | 纬度 | number | 是 |
| longitude | 经度 | number | 是 |
| width | 标注图标宽度 | number/string | 否 |
| height | 标注图标高度 | number/string | 否 |
🏷️ callout (marker 上的气泡) 属性说明
| 属性名 | 说明 | 类型 |
|---|---|---|
| content | 文本 | string |
| padding | 文本边缘留白 | number/string |
| borderRadius | 边框圆角 | number/string |
| textAlign | 文本对齐方式。有效值: left, right, center | string |
| display | 'BYCLICK':点击显示; 'ALWAYS':常显 | string |
将地图上的marker标记点,都放置在视野中 (include-points)
that.includePoints = [
    {
        longitude: xxx,
        latitude: xxx
    },
    {
        longitude: xxx,
        latitude: xxx
    }
];
这里用到的是 includePoints ,把后端返回的marker坐标点位传入这个数组里,就能自动将marker设置是视野可见范围中。
polyline (将两个坐标点连成直线)
that.polyline = [{
    points: [
        {latitude: xxx, longitude: xxx},
        {latitude: xxx, longitude: xxx}
    ],
    color: "#55bb8a", //线的颜色
    width: 8, //线的宽度
    arrowLine:true, //线内箭头
}];
🏷️ 属性说明
| 属性名 | 说明 | 类型 | 必填 |
|---|---|---|---|
| points | 经纬度数组 [{latitude: 0, longitude: 0}] | array | 是 |
| color | 线的颜色 | string | 否 |
| width | 线的宽度 | number | 否 |
| arrowLine | 带箭头的线 (默认 false) | boolean | 否 |
电子围栏
项目开发的过程中,涉及到在地图上进行多次点击,形成电子围栏。
这里的电子围栏,是通过 marker+polyline 实现的。
思路:在地图上点击时,把当前点位传入 marker 和 polyline 中,这样就会在地图上出现 线性围绕的电子围栏。
声明,当前例子是运用在小程序开发中的,非正常网页开发
具体代码:
<map
    id="myMap"
    :scale="scale"
    :show-location="true"
    :latitude="latitude" :longitude="longitude"
    :enable-satellite="true"
    :polyline="polyline"
    :markers="markers"
    @tap="chooseLocation"
>
</map>
首先,监听地图的点击事件
chooseLocation(e) {
    console.log(e,'----点击选点')
    let that = this;
    qqmapsdk.reverseGeocoder({
        location: {
            latitude: e.detail.latitude,
            longitude: e.detail.longitude,
        },
        success(res1) {
            console.log(res1,'-------逆地址解析')
            that.currentAddress = res1.result.formatted_addresses.recommend;
            that.latitude = res1.result.location.lat;
            that.longitude = res1.result.location.lng;
            // 关键是这个,获取到当前点击的点位之后,调用push方法。
            that.handleAddPoint();
        }
    })
},
push方法
handleAddPoint() {
    this.markIndex++; // marker初始id为0,每增加一个点,就加一
    this.markers.push({
        id: this.markIndex,   //id 必填项,有值就行
        width: 25,
        height: 25,
        longitude: this.longitude,
        latitude: this.latitude,
        iconPath: '/static/img/icon_address_3.png'
    });
    // 画线
    this.polyline[0].points.push({
        latitude: this.latitude,
        longitude: this.longitude
    });
    this.pointArr.push({
        lat: this.latitude,
        lng: this.longitude
    });
},data() {
return {
polyline: [{
points: [],
color: "#CA6F3A",//线条的颜色
width: 5,//宽度
borderWidth: 2,
borderColor: "#fff"
}], // 画线初始定义
markers: [], // 标记点
markIndex: 0, // 标记点初始id
pointArr: [], // 传回的电子围栏组
}
}微信小程序 JavaScriptSDK
申请key 及 下载js文件
链接:https://lbs.qq.com/miniProgram/jsSdk/jsSdkGuide/jsSdkOverview
引入
import QQMapWX from '@/utils/qqmap-wx-jssdk.js'
var qqmapsdk = new QQMapWX({
	key: '必填'
});
使用
qqmapsdk.reverseGeocoder({
    location: {
        latitude: res.latitude,
        longitude: res.longitude,
    },
    success(res1) {
        ...
    },
    fail(e) {
        ...
    }
})
🏷️ 可调用的方法
| 方法 | 说明 |
|---|---|
| search | 地点搜索,搜索周边poi,比如:“酒店” “餐饮” “娱乐” “学校” 等等 |
| getSuggestion | 用于获取输入关键字的补完与提示,帮助用户快速输入 |
| reverseGeocoder | 提供由坐标到坐标所在位置的文字描述的转换。输入坐标返回地理位置信息和附近poi列表 |
| geocoder | 提供由地址描述到所述位置坐标的转换,与逆地址解析的过程正好相反 |
| direction | 提供驾车,步行,骑行,公交的路线规划能力 |
| getCityList | 获取全国城市列表数据 |
| getDistrictByCityId | 通过城市ID返回城市下的区县 |
| calculateDistance | 计算一个点到多点的步行、驾车距离 |
TIP
具体参数,及使用,请参考上述官方文档链接
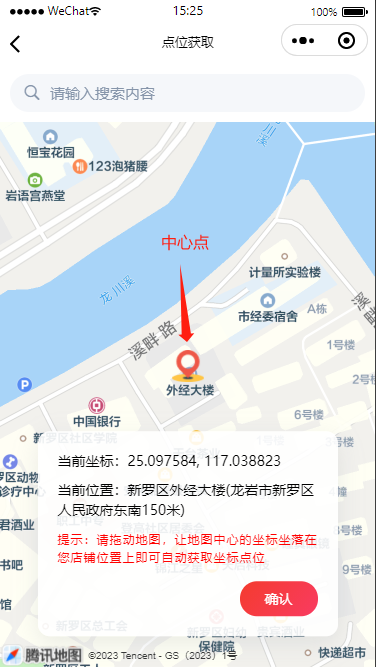
地图拖拽 - 监听事件 regionchange
运行效果
任意拖拽地图,使其位置落于中心点位。获取该点坐标和位置名称
<map id="myMap" :scale="scale" style="height: 100vh;width: 100vw;position: relative;"
    :show-location="true" :latitude="latitude" :longitude="longitude"
    :polyline="polyline" :markers="markers" :include-points="includePoints" @regionchange="regionchange"
>
    <cover-image src="@/static/img/icon_address2.png" class="icon_address"></cover-image>
</map>import QQMapWX from '@/utils/qqmap-wx-jssdk.js'
var qqmapsdk = new QQMapWX({
key: '必填'
});
// 监听地图拖拽事件
regionchange(e) {
let that = this;
let mpCtx = wx.createMapContext("myMap");
// 监听是否是拖拽,并且动作为拖拽结束
if(e.type == 'end' && e.causedBy == 'drag') {
// 获取当前地图拖拽结束后,中心点的坐标 (这里是放了一个标识点在地图中心,拖拽地图,让需要获取的点位停留在中心位置,获取坐标)
mpCtx.getCenterLocation({
type: 'gcj02',
success(res) {
console.log(res,'----center')
// 调用 接口中逆地址解析方法 获取坐标和位置信息
qqmapsdk.reverseGeocoder({
location: {
latitude: res.latitude,
longitude: res.longitude,
},
success(res1) {
console.log(res1,'-------逆地址解析')
that.currentAddress = res1.result.formatted_addresses.recommend;
that.latitude = res1.result.location.lat;
that.longitude = res1.result.location.lng;
},
fail(e) {
console.log(e,11122)
}
})
}
})
}
},搜索关键词匹配
运行效果
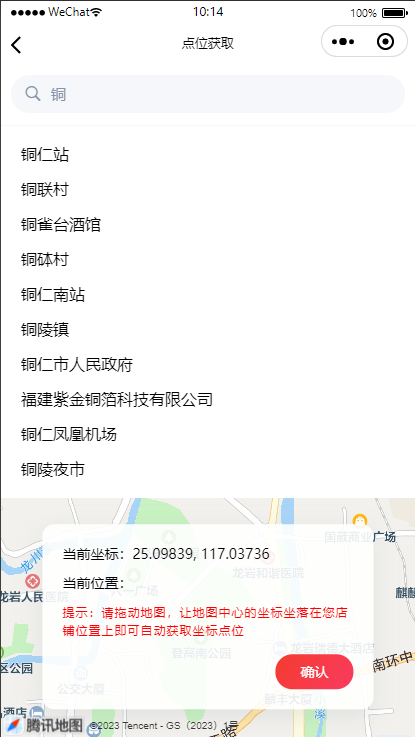
具体实现步骤
通过
input输入框的监听事件 @input,对输入框的内容进行监听获取到输入内容后,调用接口,获取放回的列表结果,渲染该列表结果。
针对返回的列表结果,增加点击事件,获取单条结果的坐标及位置相关信息
关键代码
<view class="search_box">
    <view class="input_box">
        <uni-icons type="search" color="#8695AA" size="20"></uni-icons>
        <input placeholder-style="color: #8695AA;" type="text" placeholder="请输入搜索内容" :value="searchKey" @input="handleSearch"/>
    </view>
    <view class="scroll_box" v-if="isShowList">
        <view class='item' v-for='(item,index) in searchResultList' :key='index' @click="getSearchLocation(item)" >{{item.title}}</view>
    </view>
</view>// 监听输入内容,获取搜索结果
handleSearch(e) {
console.log(e.detail.value,'----监听输入内容')
let searchKey = e.detail.value;
if(searchKey != '') {
this.mapSearch(searchKey).then( res => {
console.log(res,'-----返回结果')
if(res.data.length > 0) {
this.searchResultList = res.data;
this.isShowList = true;
}
})
} else {
this.isShowList = false;
}
},
// 腾讯地图关键词补充接口
mapSearch(keyword){
let promise = new Promise(function(resolve, reject) {
// 调用接口
qqmapsdk.getSuggestion({
keyword: keyword, //搜索关键词
region: '龙岩市',
success: function (res) {
resolve(res)
},
fail: function (res) {
reject(res)
}
});
});
return promise
},项目例子
概述
由于实际项目中,需要显示出两个坐标点直接的导航路线图(折线),而不是直接连成直线的形式。所以这里用到了腾讯地图的 Direction API 路线规划接口,通过将获取到的两个坐标点传入该接口,进而返回规划路线的坐标点位,运用 polyline,将直线转成折线。
需要提前准备好腾讯地图的key,如果没有的话,可以先申请
🔗:https://lbs.qq.com/dev/console/key/add
小程序配置 (manifest.json)
"mp-weixin" : {
    "permission" : {
        "scope.userLocation": {
            "desc": "你的位置信息将用于小程序位置接口的效果展示"
        }
    },
    "requiredPrivateInfos": ["getLocation"]
}
调用路线规划接口
let url="https://apis.map.qq.com/ws/direction/v1/driving/"; //请求路径
    url+=`?from=${latitude},${longitude}`;  //起点坐标
    url+=`&to=${latitude},${longitude}`;  //终点坐标
    url+="&key=xxx"; //开发key,可在控制台自助创建

let that = this;

// 这里的请求可以进行封装,或者另起一个方法写入,把url传入。这里就不封装了
uni.request({
    url: url,
    success(res) {
        let coords = res.data.result.routes[0].polyline, pl = [];
        //坐标解压(返回的点串坐标,通过前向差分进行压缩)
        let kr = 1000000;
        for (let i = 2; i < coords.length; i++) {
            coords[i] = Number(coords[i - 2]) + Number(coords[i]) / kr;
        }
        //将解压后的坐标放入点串数组pl中
        for (let i = 0; i < coords.length; i += 2) {
            pl.push({
                latitude: coords[i],
                longitude: coords[i+1]
            });
        }
        //设置连线数组 将接口返回的坐标赋值给points,然后绘制成折线
        that.polyline = [{
            points: pl,
            color: "#55bb8a", //线的颜色
            width: 8, //线的宽度
            arrowLine:true, //线内箭头
        }];
        // 这里是将接口返回的计算距离、时间,赋值给data,如果有用这两个参数的话
        Object.assign(that.dataInfo,{
            distance: res.data.result.routes[0].distance,
            duration: res.data.result.routes[0].duration
        })
    }
})
🏷️ Direction API 参数属性 说明
| 属性名 | 说明 | 必填 |
|---|---|---|
| key | 开发key | 是 |
| from | 起点位置坐标(from=40.034852,116.319820) | 是 |
| to | 终点位置坐标(终点位置坐标) | 是 |
| policy | 路线规划的策略&单项偏好配置(具体可选值请参考官方文档) | 否 |
🏷️ 接口返回值 说明
由于接口返回值中,关键的数据都在 res.data.result.routes 里,所以这里仅对返回的 routes(路线方案) 中的属性值做介绍
| 属性名 | 说明 |
|---|---|
| distance | 方案总距离,单位:米 |
| duration | 方案估算时间(结合路况),单位:分钟 |
| polyline | 方案路线坐标点串(该点串经过压缩,解压方法直接参考上方代码) |
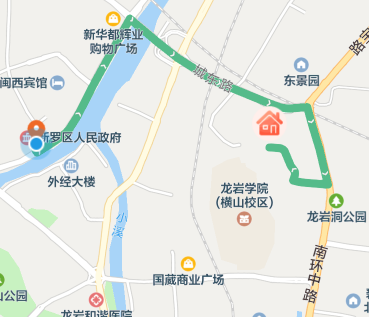
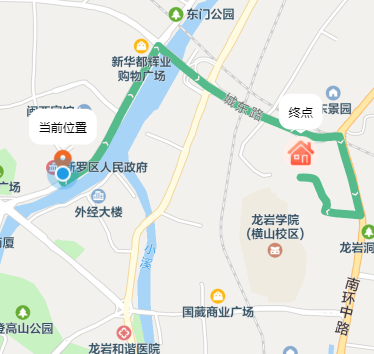
实现的效果图
不带气泡
带气泡(callout 属性)
📖 参考文档
- 路线规划 - 接口文档
- 折线应用 - 路线规划示例 官方文档 具体对返回的路线坐标解压,可以参考这里面的
- uniapp - map 组件文档
- 微信小程序 - map 组件文档
- 微信小程序实现导航功能
- 【腾讯地图】【微信小程序】路线规划
TIP
注:最后两个参考链接,用的是别的接口,以及不同的的请求方法,暂时没做研究,感兴趣或者又需求的小伙伴可以参考一下